
| Web Site of ToyTrains1 |
| How To Build A Display Case A Photo Essay |
After a while in this hobby, you quite often find that you have more trains than can reasonably fit on your layout. While you can add another layout in another part of the house (I did), you reach a point where there are just too many trains and too few places to put them. If you're like me, you don't want to keep them stored away in their boxes but rather want to show them off. At this point, you start to look for places to display your trains and your thoughts invariably turn to display cases. Initially, I had a pair of cases custom built for me by a craftsman that I met at a local train show. The cases were beautiful but were quite expensive. As the need for more display cases arose, I was able to examine how the cases were put together and combine my love of trains with my love of woodworking to fashion my own display cases. (Twenty-five years of watching master carpenter Norm Abram on TV certainly didn't hurt!) In this photo essay, I'll share with you my method for building display cases (I've built ten now, ranging in size from the small one that I'll show you here to quite large 3'x8' cases) including all measurements and tricks that I've learned over the years.
Before buying wood, before laying out plans, you need to know where you want to put the display case. This will determine the size, the number of shelves, and how much wood you will need. In this case, the display case is going against the front of my layout's ready yard, closing the gap and spanning the large display cases that are on either side of the yard. That means that the display case is going to be 26½" wide by 34" tall.
Given the height -- 34" -- we can determine how many shelves we can put into the case. The minimum shelf spacing for O-gauge trains is about 4½" between shelves. From the height, we need to subtract the thickness of the top and bottom -- with the one-by lumber we'll be using, that's ¾" each or 1½" total, meaning we have 32½" inside the case for the shelves and the trains. And remember, we need to allow for the thickness of the shelves themselves; that's ¾" each times the number of shelves. If we want, say, five shelves, that's 3¾" for shelf thickness which means we have 28¾" to divide up for our trains. With the bottom of the case as a sixth shelf, this means that we're going to have 4¾" between the shelves (with a tad extra between the top shelf and the top of the case). Now that we know the size and the number of shelves, we can get the raw materials -- wood. I build my display cases out of red oak. I use 1x6 for the frame and 1x4 for the shelves. Given the dimensions of our case, one seven foot length and one six foot length of each size is enough wood to complete the project.

The display cases that I build are 5" in width. Since a 1x6 is actually 5½" wide, we need to rip it to 5". We do this on the table saw.

The fence is set to 5". It pays to measure from the fence to the blade to double-check the accuracy of the gauge. Depending on the kerf of the blade, you may need to adjust your gauge.

There are many ways to join the pieces of wood together to make the frame. If this were fine furniture, I might use a decorative (and very strong) dovetail joint. If it were just some shelves in the garage, I'd probably use a butt joint with nails or screws. Since it's a display case for my trains, I use a mitered joint, which gives the display case a finished look without too much bother. We cut the first 45° angle at the end of one 1x6 board.
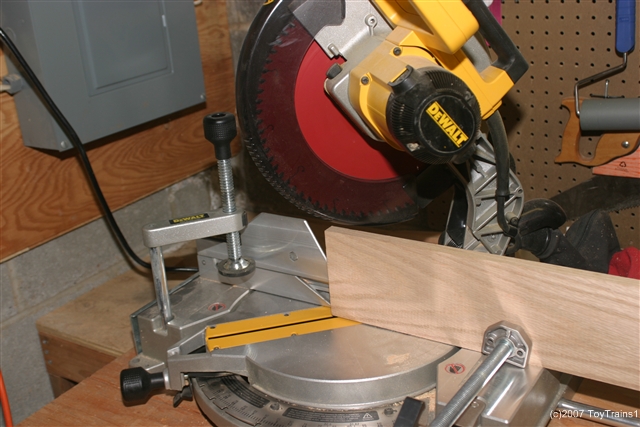
Note that you need a 12" power miter saw to cut completely through the 5" wide board. Here's the mitered end.
Once we have one end mitered, we measure from that end for our other cut. I find it helps to draw the 45° angle at the measurement to make sure I cut the miter in the correct direction.

Here we're getting ready to make the cut. Measure twice, cut once.

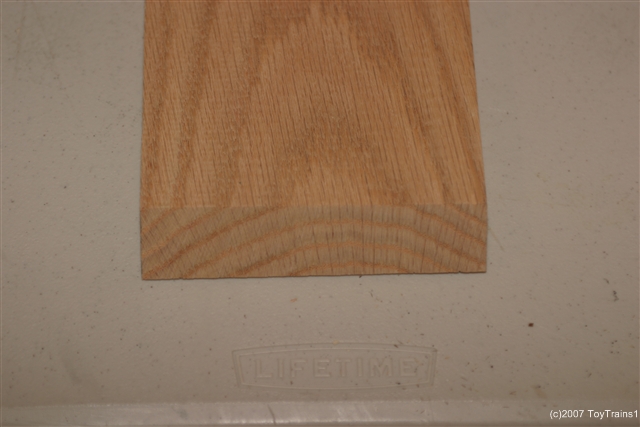
Here are the two mitered boards for the vertical sides. The boards for the top and bottom are cut in the same way.

Here we've cut all four sides for the frame and have them dry fitted together to check the joints.
The joints are glued together (the only place metal fasteners are actually used in the display case is in the attachment of the back). To make the joints much stronger, I use biskit joinery. The first step in creating this joint is to mark the center of the mitered edge of each board.

This is the biskit joiner (also called a plate joiner). You set the depth to half the thickness of the wood and adjust the depth of cut for the size biskit that you use. In this case, I use a #20 biskit. You align the guide on the biskit joiner with the center mark on your mitered edge and plunge the joiner. If you don't have one of these tools and don't want to buy one, you can rent one at a tool rental store. You'll need it for just a few hours.
Here's the slot that's created to receive the biskit.
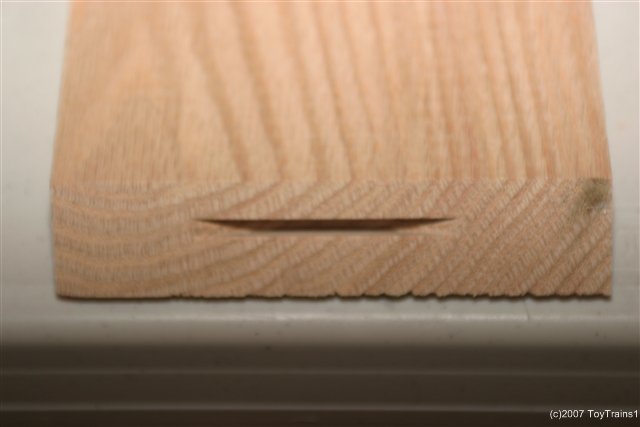
And here's the slot with the biskit inserted. You do this for each mitered edge on each of the four boards (two sides, top, and bottom) that make up the frame. The biskits are made out of beech wood and swell when they get wet (with glue), creating a very tight joint.

With all the biskit slots cut and biskits inserted, we once again dry fit the frame to make sure that everything aligns properly.

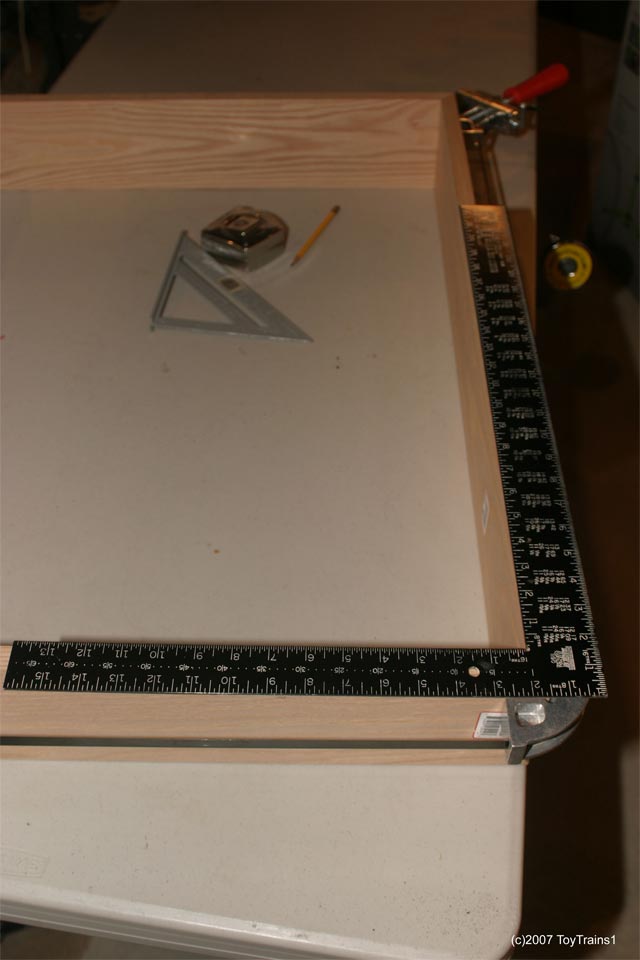
At this point, I clamp the frame and check for square using a framing square. Occasionally you may need to adjust one or more of the joints to bring the frame into square. Since these are relatively wide boards, remember to check for square at both the top and the bottom along the width of the boards.
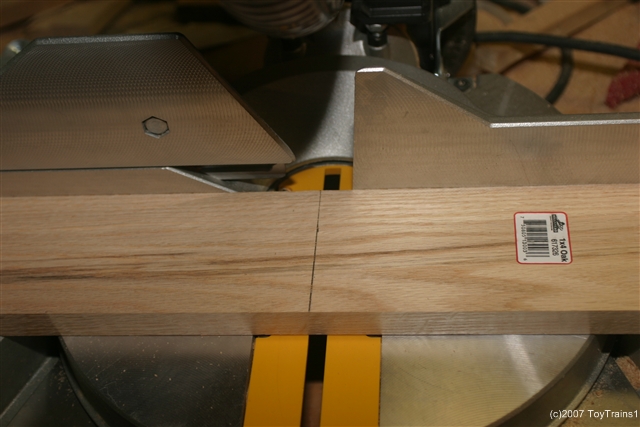
With the frame assembled and clamped, we can measure for the length of the shelves. After squaring up one end of the board, we mark the length on the 1x4 and cut it on the power miter saw.
Here, all five shelves have been cut and inserted into the clamped frame to ensure that they fit properly. It's better to find any mistakes now, before you put more work into it.

Since I've built a number of display cases, I've come up with a few jigs that save a great deal of time and effort. The first is a simple centering jig for the shelves. It's just a block that's cut off of the scrap from a previous shelf. It has marks on either side for the exact center of a 1x4 shelf board. You simple align it with the back of the shelf and transfer the mark to the shelf. The front of the jig is bullnosed so you can use it with both rough and finished shelves.

The shelves are butt jointed and glued to the frame. Again, to strengthen the joint, biskit joinery is used. You align the biskit joiner with the center mark you've made on the shelf and plunge it to make the slot.

Here, all five shelves have been slotted, ready for the biskits.

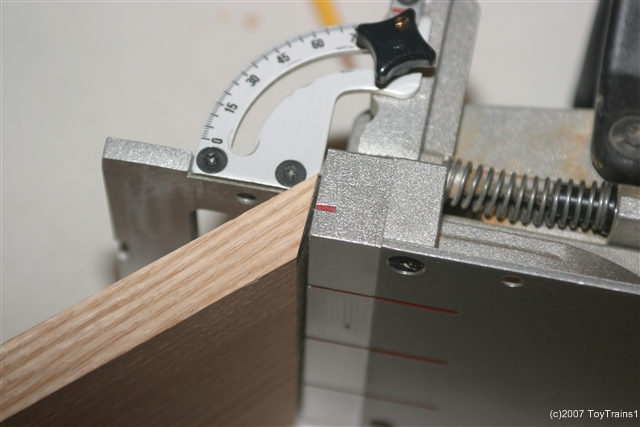
You now need to mark off the sides of the case in order to make your biskit slots for the shelves. We determined the shelf spacing above; if you're going to display taller cars, such as husky stacks, which need more than 4¾" between shelves, you'll need to adjust the spacing accordingly. Starting at the bottom edge of the side board, make a mark at 4¾" up and use a speed square to draw the line across the board. Now mark off the ¾" thickness of the shelf. Repeat this all the way up the board and then repeat it on the other side board.

To cut the biskit slots in the side boards, there's another jig that I've made that really saves a lot of time and hassle. From a scrap piece of 1x6 wood, square up and then cut a block that's the height of the space between shelves plus the thickness of a shelf (4¾" + ¾" = 5½"). At the top, mark off the thickness of the shelf. Mark off the center of the block and cut a biskit slot halfway down the thickness of the shelf (3/8" from the top of the block). Using a speed square, transfer the center mark to the other side of the block. Transfer the center mark from the top of the block to the bottom. Put a biskit into the slot.

Since the back of the display case is going to be recessed, we need to allow for the thickness of the back. I use ¼" luan plywood for the back, so the line you see on the right represents the thickness of the back. We need to cut the first biskit slot on the side board freehand. To do so, use the shelf center jig. Position it so the back is even with where the back of the case will be and transfer the center mark to the side board.

Carefully align the biskit joiner with the mark you've made and with the edge of line marking off the thickness of the shelf and plunge the blade to make the slot halfway between the lines representing the thickness of the shelf.

Here's the finished slot, positioned so that the shelf will align perfectly with the back of the display case.

Using our jig, we can now easily cut the remaining biskit slots. Insert the biskit in the jig into the slot we've cut above. Position the biskit joiner as shown, aligning with the center mark on the block. Plunge it to make the next slot. It will be perfectly aligned. Continue this all the way up the side board.

Here's the side board with all the biskit slots cut. Do the same for the other side board.

I mentioned the back being recessed. This is so that you don't see the edge of the plywood at the back of the cabinet. To recess it, you cut a rabbet (a recess at the edge) using either several passes at a table saw with a normal blade, a table saw with a stacked dado-head cutter, a router table, etc. at the back inside edge of each member of the frame. The rabbet width should match the thickness of the backing material (in this case, ¼" to match the luan plywood) and I usually cut them one-half the thickness of the board in depth (in this case, ⅜"). This is what the rabbet looks like when done.

This is a great time to insert biskits and dry fit everything to make sure it all comes together properly.

It's now time to deal with doors. You may not want them for your case; I find them useful in that they both protect the contents of the case and keep out a lot of dust (my layout is in the basement). You can make all kinds of doors -- I make sliding doors, plate glass for the cabinets that hang high on the wall, unbreakable acrylic plastic for those that sit on the floor. Rather than complicated sliding mechanisms, I simple cut dadoes (a dado is nothing more than a slot cut into the wood) for the doors to slide in (I have other tricks that I will share a little later). On the bottom and the sides, the dados are 1/8" deep. At the top, the dadoes are much deeper so that you can insert the doors, lift them up and over the bottom dado edges, and sit them in the bottom dadoes. While there are many ways to cut dadoes, I use a stacked dado head cutter in my table saw. Here's the setup.

This is what the dadoes look like on a side board. The dado is 1/16" wider than the door material. Since I'm using ¼" acrylic plastic, the stacked dado head cutter is set to 5/16" wide. There are two dadoes with a ⅛" gap between them. I normally position the first door ¼" from the front edge of the case so what you're looking at, from the front, is actually ¼" of normal wood, a 5/16" dado, ⅛" of normal wood to separate the doors, and the second 5/16" dado.

Here are the dadoes in the top of the case. With ⅛" deep dadoes on the bottom, the depth of the top dadoes has to be at least ⅜" to ensure proper function of the doors; I usually cut them 7/16" deep to be on the safe side.

After finishing the dadoes for the doors, we still have more dadoes to cut. I've found that having dadoes for the wheel flanges to sit in greatly increases the stability of the trains on the shelves and helps center them between the back and the front of the shelf, ensuring that nothing rubs against them. I cut them making two passes with a relatively thick kerf blade (1/16") in the table saw. The spacing of the dadoes is dictated by the fact that the nominal spacing between the inside flanges of O-gauge wheels is 1-1/16". The blade depth is set to 3/16".

As you can see, we start our flange dado at 1¼" from the back of the shelf.

After the first pass, move the fence 1/16" and make the second pass. This gives a ⅛" wide dado.

Move the fence to 2-5/16", make the first pass, move the fence 1/16" and make the second pass to create the second wheel dado. As you can see, an O-gauge truck fits perfectly into the two dadoes and is centered on the shelf.

It's now time to do some finish work. You may want to keep your shelves with a square front. I find that a bullnose makes them look better, but that's just my personal taste. To bullnose the shelves, I use a ⅜" carbide roundover bit in my router table.

After one pass through the router table, you can see that we have half of a bullnose.

After the second pass, we have a bullnosed shelf.

With the shelves bullnosed, all of the machining work is completed. At this point, I once again dry fit everything to make sure yet again that it's all fitting together properly. This is also a good time to mark the centerline for each shelf on the back of the case on both sides. You'll see why in a little bit.

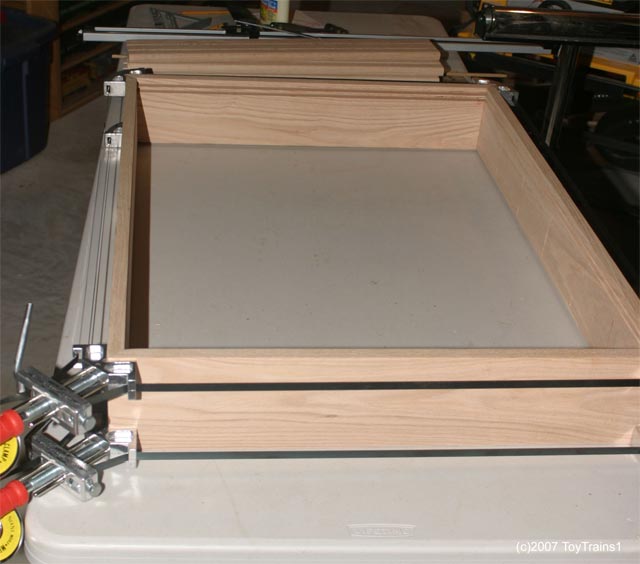
Here's the entire thing dry fit and in the clamps. By the way, those are Merle adjustable corner clamps and I find them invaluable for projects such as this. The steel bands allow me to easily use them on display cases up to eight feet wide.
And now, we sand. And sand. And sand some more. After one attempt in the basement, I now sand only out on the deck as the fine sanding dust gets all over the layout no mater what precautions I take. The shelf is set in my Workmate in position for me to sand the bullnose. I use three successively finer grits -- 60, 120, 220 -- in my random orbital sander to remove labels, pencil marks, imperfections, etc., and leave all of the surfaces of all of the parts with a very smooth finish. Wipe off all of the wood with a tack cloth when you're finished to remove any dust as you do not want it affecting the finish. Remember to sand the front edge of each carcase member.

With the sanding completed, we now can glue the parts together. I normally glue the top and bottom to one of the sides, using the biskits. I dry fit the fourth side with biskits, clamp the whole thing, and allow the glue to dry overnight. CHECK FOR SQUARE! If it's out of square, adjust the clamps and use pipe clamps as necessary to wrack the case so it's square both top and bottom.
Here, the glue has dried on the three sides and we're setting up for the final gluing of the display case. All of the parts are laid out. Apply glue to all mating surfaces and the biskits. I find it easiest to glue-up all of the shelves on one side, fit them, glue-up the other side, and finally line up and attach the last side board.

Once you have glued up all the parts and lightly clamped the case, stand it up and ensure that the back of each shelf is even with the inside of the rabbet on the side pieces that will accept the back. This ensures that the back of each shelf will meet the back. When everything is even, tighten up the clamps and use pipe clamps as necessary to bring all of the mating surfaces together.

Check for square again, both top and bottom, and adjust as necessary. Allow the glue to dry overnight.

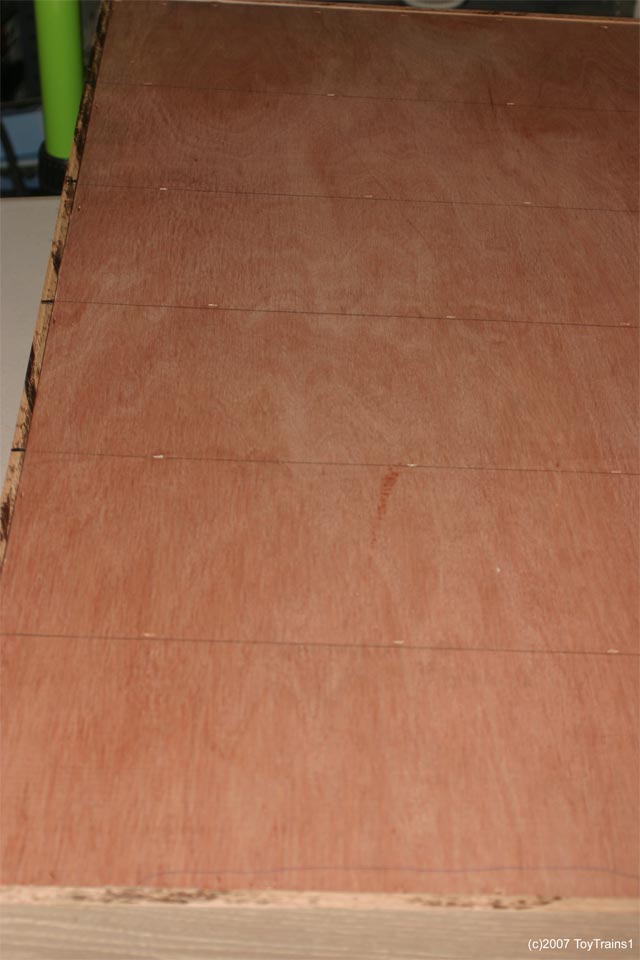
Once the glue is dry, remove the clamps. This is a great time to gently scrape away any glue squeeze-out as well as hand sand any marks that may have been left by the clamps. You can now measure the insides of the rabbet top to bottom and side to side to get the size for the luan plywood back.

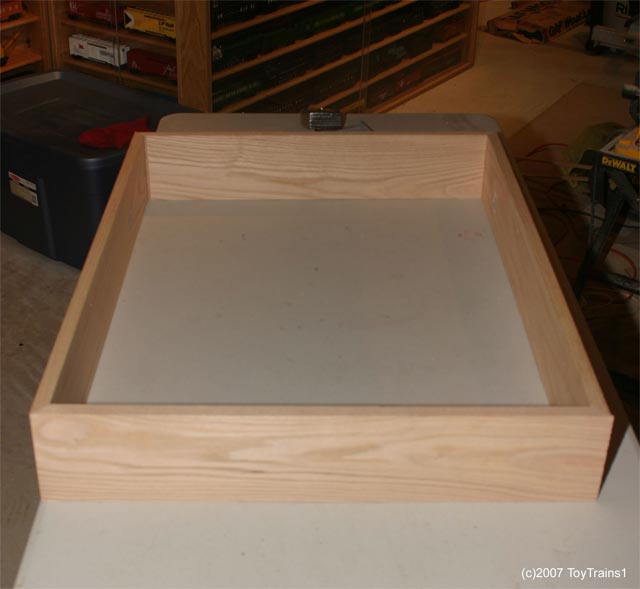
Here's the luan plywood back, cut and fitted into the rabbet at the back of the frame and fastened with narrow crown staples around the perimeter, driven in by a pneumatic stapler (driven at a slight angle into the frame). Note how I've drawn lines to connect the shelf centerline marks on the back of the frame across the plywood back. See the indentations along those lines? Those are narrow crown staples that attach the plywood back to the shelves -- I use one staple every six inches or so. This adds great strength and rigidity to the case as well as ensuring that the shelves do not bow when loaded with heavy locomotives. While that's not a problem with a case this size, it's important if you're building a case that's eight feet long (my next project).
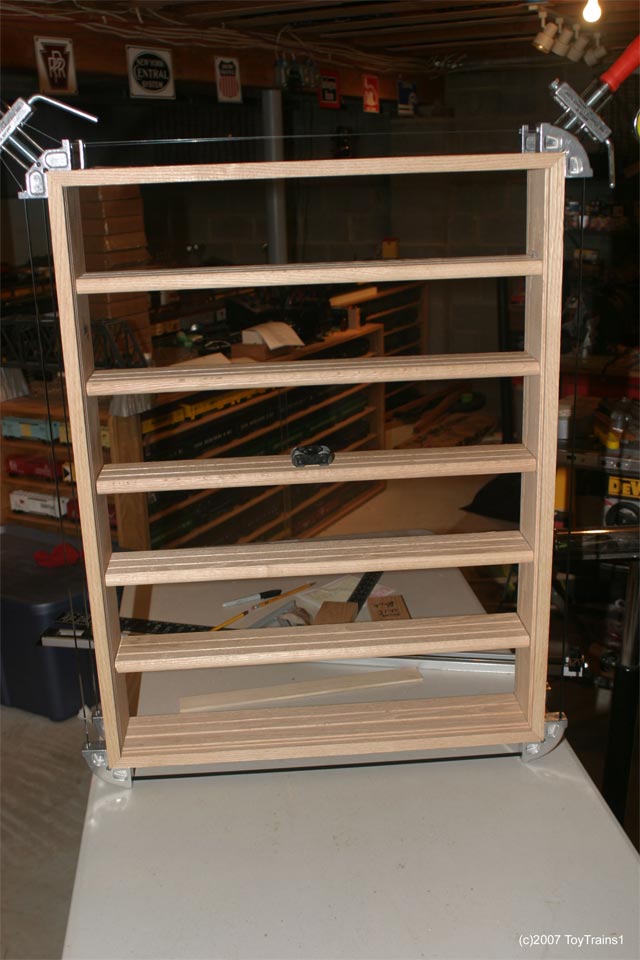
And here's the final product, awaiting final touchup hand sanding and three coats of water-based polyurethane.

Here I've inserted the doors. To measure for them, take the inside height and add 5/16" to account for the dadoes in which the doors will slide. Take the inside width, divide it in half, and add about an inch for the door overlap. The doors are made of acrylic plastic (Plexiglas is one brand that I use) and cut to size using a fine toothed plywood blade on the table saw. To make it easier for the doors to slide, I put a slight chamfer on either side of the bottom edge of each door. For large doors, I use a carbide chamfering bit in the router table; for small doors like these, I just use a Surform plane. A few passes by hand is all it takes. A couple of passes with a stone makes everything nice and smooth. I'll add self-adhesive stick-on finger pulls later.

After just one coat of semi-gloss water-based polyurethane, you can see how the grain of the wood starts to stand out. It will now be hand sanded with 220 grit paper and receive the second coat. After that's dry, it will be hand sanded with 400 grit paper and receive the third and final coat. That will be lightly rubbed with 400 grit wet paper to give the final finish.

After three coats of semi-gloss polyurethane and a final rubbing with 400 grit paper, we have the finished product.

At the beginning of this photo essay, I showed the location that the case was designed to fit. Here it is in that location. And, what's a train display case without trains?

All of the text contained within this page and all of the photographs and videos taken by ToyTrains1 are copyright (c) 2000 - 2023 by ToyTrains1, and may not be reproduced, in whole or in part, without the written consent of ToyTrains1.
If you wish to use any of my content, please see my detailed copyright statement for terms and conditions of use.